
Injection molding operators and hot runner technician frequently face tricky diagnostic issues: temperature readings off by dozens of degrees, short-circuit alarms immediately after installation, or uncertainty about whether a J-type and K-type thermocouple are interchangeable. Misdiagnosing these issues leads to repeated teardowns and costly downtime during mold trials.
This guide leverages practical field experience with hot runner heater bands to break down thermocouple selection, standardized installation steps, and rapid troubleshooting solutions—in terms clear enough for beginners and master technicians alike.
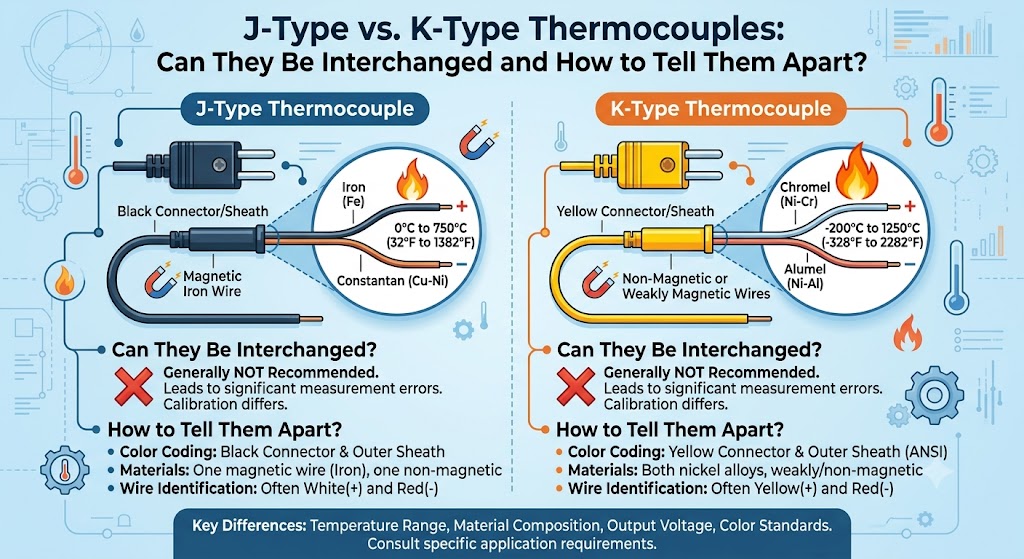
1. Can You Interchange J-Type and K-Type Thermocouples?
Direct Answer: NO. You cannot mix or interchange J-type and K-type thermocouples unless you reconfigure your temperature controller settings.
Connecting a J-type thermocouple to a controller configured for a K-type sensor (or vice versa) will result in severe temperature drift, inaccurate data, and potential thermal runaway.
Key Differences at a Glance
| Parameter | J-Type Thermocouple (Fe-CuNi) | K-Type Thermocouple (NiCr-NiSi) |
| Temperature Range | $0^{\circ}\text{C}$ to $750^{\circ}\text{C}$ | $0^{\circ}\text{C}$ to $1200^{\circ}\text{C}$ |
| Material Composition | Iron (+) / Constantan (-) | Chromel (+) / Alumel (-) |
| Color Code (ANSI) | White (+) / Red (-) | Yellow (+) / Red (-) |
| Sensitivity | $\sim 50\text{ }\mu\text{V/}^{\circ}\text{C}$ (Higher at lower temps) | $\sim 41\text{ }\mu\text{V/}^{\circ}\text{C}$ |
| Best Used For | Small preform/cap molds, narrow copper sleeves | Universal industrial use, multi-zone hot runners |
| Limitations | Iron wire oxidizes quickly above $280^{\circ}\text{C}$ in open air | Slightly lower output signal at sub-zero temperatures |
2. Choosing the Right Thermocouple for Hot Runners
J-Type Thermocouples: Ideal for Low-Temperature, Small Molds
-
Best Suited For: Low-temperature applications, small PET bottle preform molds, and cap runner systems.
-
Pros: Thinner wire gauge fits tight installation grooves in brass heater sleeves.
-
Cons: Susceptible to oxidation at high temperatures; not recommended for long-term operation in molds running above $280^{\circ}\text{C}$.
K-Type Thermocouples: The Universal Industry Standard
-
Best Suited For: Medium-to-large plastic injection molds, high-temperature engineering resins, and multi-zone hot runner systems.
-
Pros: Exceptional high-temperature tolerance and oxidation resistance. Standardized configuration across most commercial hot runner heating components.
3. Standard Step-by-Step Installation Guide
[Clean Thermowell] ➔ [Place Gasket/Shim] ➔ [Secure Retaining Clip] ➔ [Route Wiring Safely] ➔ [Check Polarity]
-
Clean the Sensor Bore: Remove all oil, dust, and aluminum shavings from the brass sleeve thermowell to ensure full physical contact.
-
Insert the Thermal Pad/Gasket: Place the thermocouple gasket flat at the bottom of the bore. Never leave the probe suspended in air without contacting the heating element.
-
Tighten the Retaining Clip: Apply moderate pressure. Over-tightening can crush the internal sensing junction; under-tightening causes poor thermal transfer and sluggish response.
-
Isolate Wire Routing: Route thermocouple extension wires clear of bare heating elements, dry-firing cartridge heaters, and high-temperature coils to prevent jacket melting and electrical shorts.
-
Verify Wiring Polarity:
-
General Industrial Rule: Red is negative ($-$). Double-check the terminal markings on your temperature control unit before powering on.
-
4. Quick Troubleshooting Matrix for Temperature Anomaly Faults
Fault 1: Large Discrepancy Between Displayed Temperature and Actual Mold Temp
-
Root Cause: The probe is not fully seated in the cavity, the contact gasket is missing, or the compensation wire has degraded due to heat exposure.
-
Action: Disassemble the assembly, inspect for proper mechanical contact, and replace aged extension wiring with high-temperature glass-braided wire.
Fault 2: Controller Displays Short-Circuit Alarm or Erratic Jumps
-
Root Cause: The outer insulation jacket melted against a heater band, causing positive and negative leads to touch, or the sensing tip has grounded out internally.
-
Action: Re-route the wiring harness, apply high-temperature fiberglass sleeving, or replace the damaged thermocouple probe.
Fault 3: Slow Temperature Rise or Controller Fails to Reach Setpoint
-
Root Cause: Polarity is reversed (positive/negative swapped) OR a J-type thermocouple is plugged into a K-type control channel.
-
Action: Verify the thermocouple type stamped on the sheath/wire label and update the sensor input selection in the controller settings.
Post time: 2026-08-01